


This video shows how you can bypass your Tecno F1 after factory
reset/hard reset.Every step are in the video.Happy bypassing.Don't
forget to subscribe for more videos to come.
Friday, December 13, 2019
Monday, November 25, 2019
How to flash Tecno W5

This video shows how to flash Tecno W5 using Miracle box..
Requirements
1.Miracle box installed on your PC with Mtk/Com drivers.
2.Usb cable to connect your phone to PC.
3.Download a flash file for tecno W5.
Steps;
1.Open or run your Miracle box.
2.Choose MTK,Write,Boot select choose 8th Boot(MT65XX & MT67XX/8127)
3.Load the extracted flash file of your Tecno W5.
4.Next click start to start flashing process.
5.Make sure your phone battery has 70% of charge.
6.Switch off your mobile and connect with PC using a working USB cable.
7.Miracle box will detect & start flashing wait until it finishes.
8.Congrats you have flashed your mobile phone successfully.
Note;Make sure you flash your phone with the right firmware.if you flash with wrong one you may end up bricking your mobile.
Thursday, November 21, 2019
Huawei Y625-U32 Flashing and Unbrick Solution

Huawei
Y625 phone is one of the worst phones in the market. Phone have a lot
of problems which is related to EMMC, as a result, phone will have one
of these cases.
Huawei y625 Problems
- stuck at logo
- FCs msgs
- Encryption unsuccessful problem
Solution!
Now to fix those problems we need to re-program (restructure) that EMMC,
But with that model it’s a little hard process.
In most cases phone won’t go to Recovery so you can flash FWs from there, and if it enters Recovery, it will show error while flashing.
Now, since this is a Qualcomm based phone, that means it has a Qualcomm Download mode (qdloader),From there we are going to do whatever we want!
How to Enable Enable QDloader Mode?
1. Disassemble the phone.2. Short these two pins with a tweezers.
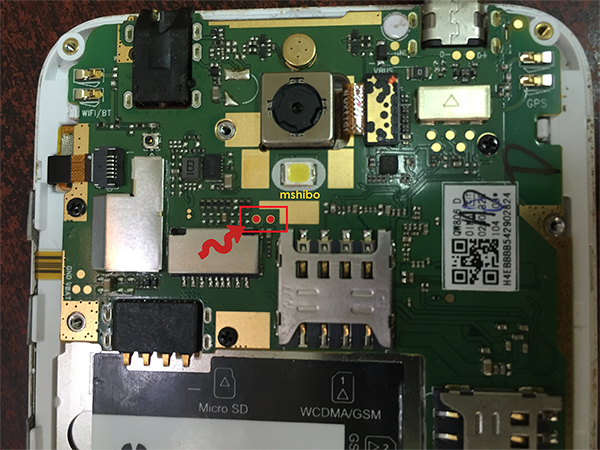
3. Connect phone to PC (without battery)
4. Check Device Manager > Ports
5. Now your phone in Qualcomm Download Mode
Let’s move to the Flashing part.
Flashing the phone
1. Download required files from link below.2. Run Huyie Download tool as Administrator.
3. Follow these screenshot.
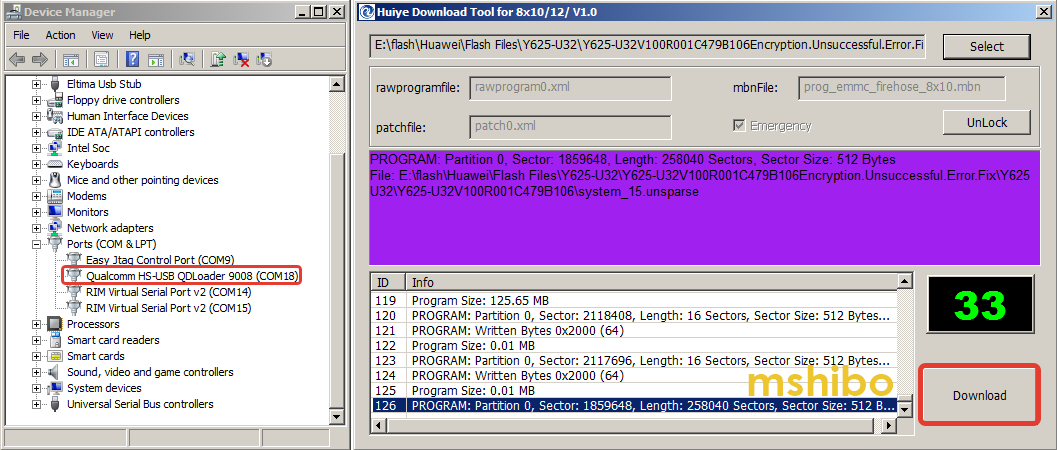
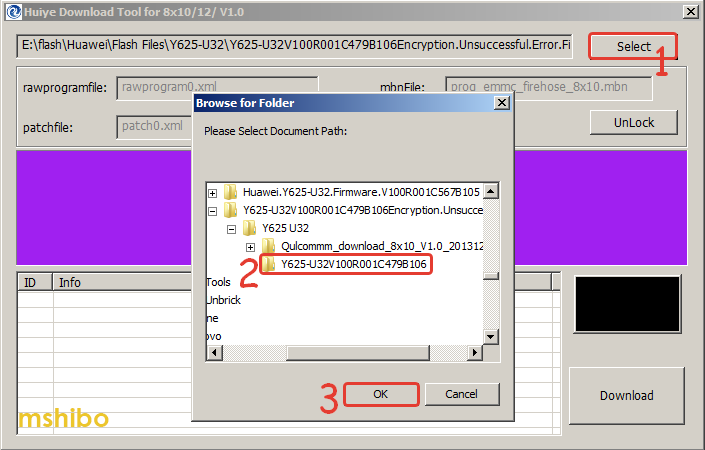
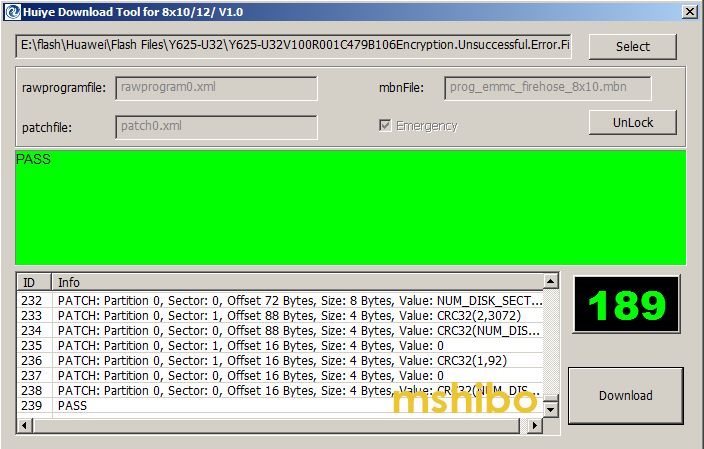
4. Disconnect the phone and Power it on.
You’re Done!
Huawei Y625-U32 Firmware.The Huyie Download tool is included with the firmware.
Note: This is not an SD_Upgrade package. This is the factory firmware which is used to flash the phone in Qualcomm Download Mode.
Important: This method not only works with Y625-U32, it should work for all Huawei Qualcomm based phones,
but you’ll need to find the Testpoint and the Factory firmware.
IMEI Repair
- Download this file Y625-U32_BB_IMEI_Repair
- Root the phone and Install BusyBox.
- Connect phone to PC and run CMD.
- Run these commands one by one.
adb push modem.img /data/local/tmp/modem.img
adb shell su -c “dd if=/data/local/tmp/modem.img of=/dev/block/mmcblk0p12”
adb push modemst1.img /data/local/tmp/modemst1.img
adb shell su -c “dd if=/data/local/tmp/modemst1.img of=/dev/block/mmcblk0p7”
adb push modemst2.img /data/local/tmp/modemst2.img
adb shell su -c “dd if=/data/local/tmp/modemst2.img of=/dev/block/mmcblk0p8”
- Reboot phone
If this guide was helpful for you just Pray for me and share it with friends.
Friday, November 1, 2019
How To Flash Galaxy A9 (SM-A920F) Android 9.0 Pie Firmware One UI [ODIN]

Samsung has released the first Android 9.0 Pie update for the Galaxy A9 (2018) variant. Samsung is continuing with the streak of Pie updates after updating the flagship lineup to Android 9.0, namely the Galaxy S9, S8, Note 9 and Note 8. Now Samsung is switching its focus to its midrange devices. It has already released the Pie update for the Galaxy A8+ in Russia and has an active Beta Program from the Galaxy A7.
As SamMobile found out, Samsung is rolling out the Pie update to all Galaxy A9 devices in Poland. The software version of the new firmware is A920FXXU1BSC5. Furthermore, it comes with February 2019 security patch. The rollout is limited only to the region of Poland at the moment.
How To Install Pie Firmware on Galaxy A9 (SM-A920F)
If you live in Poland and have a Galaxy A9 device, check if you are eligible for the OTA update. To check for an OTA update, go to Settings > Software Update and tap on Download and install. If the phone says there is a new update, download and install it. If it says “Your software is up to date” and you are still on Oreo, then proceed with the tutorial below to flash Pie manually with Odin.Note: The update process involves downloading and flashing the stock Pie firmware using ODIN, Samsung’s flashing tool. This is a routine process that it is done by many people for many reasons. There are no risks involved if you carefully follow each and every step stated below. We are not responsible if you damage or brick your phone.
Preparations
- Download Samsung Galaxy A9 USB Drivers | Install
- Download ODIN Flashing Tool | Install
- Go to Settings > About Phone > Software Information and tap seven times on Build Number. This will enable Developer Options.
- Go to Settings > Developer Options and enable USB Debugging. This will allow your phone to communicate with the computer.
- Please back up EVERYTHING on your phone. All of your data might be deleted in the process, so please be prepared.
- Charge your phone to at least 75%. If something goes wrong or the phone gets stuck, it will not turn off during the process.
Download Pie Firmware for Galaxy A9
- Galaxy A9 (A920FXXU1BSC5) Firmware | Download
Steps To Install Pie Firmware on Galaxy A9
- Download the Galaxy A9 firmware and Odin package. Extract both files.
- Press and hold the power button and tap on Power off.
- Enter Download Mode. To do so, press and hold the volume down, Bixby and power keys at the same time.
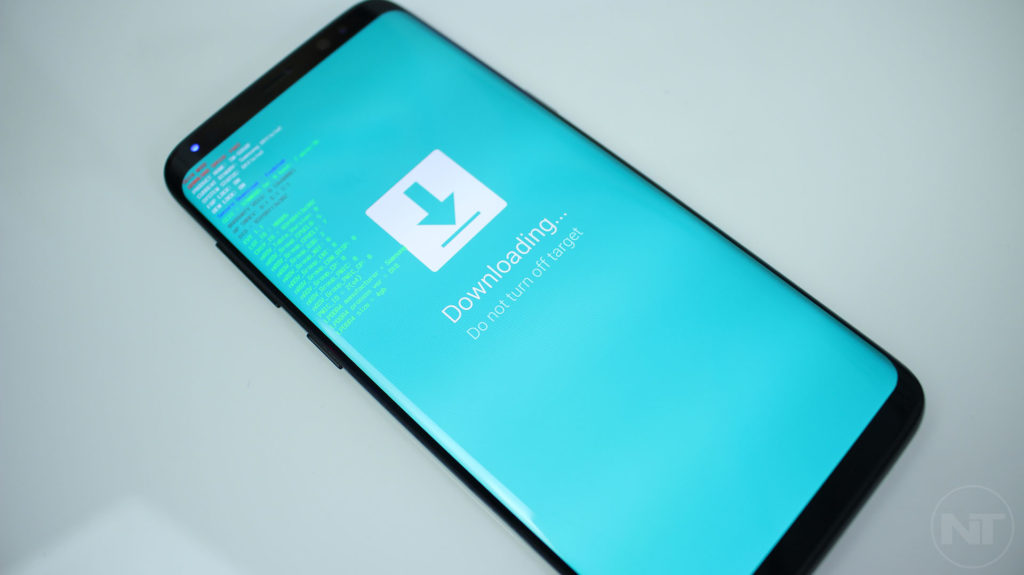
- When the warning screen appears, press the volume up key.
- In ODIN, choose the proper files for BL, AP, CP, and CSC. For CSC, choose HOME_CSC_OXM_A920FOXM1BSC5.
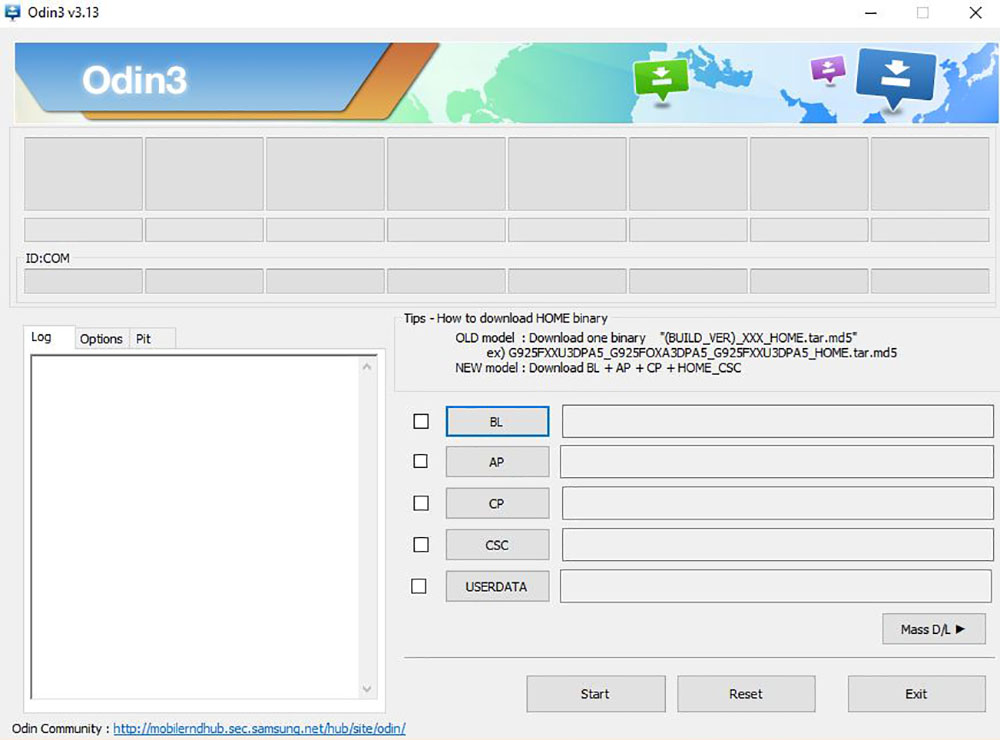
- Once you have selected all the files, click on the Start button.
Enjoy One UI, the new dark mode and all of the features that this update brings. If you are having any issues or problems, let us know below.
Thursday, October 31, 2019
How To Flash Official Firmware on Samsung Galaxy S8 & S8+ And Revert To Stock


If you have an Android phone, and most specifically a Samsung Galaxy S8 or Galaxy S8+, you have most probably rooted your phone, installed a custom recovery or a custom ROM. These are some of the benefits that the Android OS gives to users.
The Samsung Galaxy S8 has and will always have a strong support from developers. There are and will be a plethora of custom ROMs to install, kernels to improve performance, and mods to completely change the user experience of the phone.
Of course, installing ROMs and fancy mods is all nice and fun, until problems start to arise. No matter how fast the Galaxy S8 is, even with the latest Exynos or Snapdragon 835 chipset and with 4 GB of RAM, it will eventually stutter and overall slow down. Luckily, this can be easily fixed by flashing a stock firmware.
With Odin, you can easily flash a stock firmware on the Samsung Galaxy S8 or S8 Plus. An official firmware reverts the phone back to stock. So if you are rooted or have a custom recovery or ROM installed, they will all be gone. Flashing a stock firmware is a great way to revert the phone back to stock, and make it look like brand new.

How To Revert Galaxy S8 and S8+ To Stock By Flashing Official Firmware
Note: If your phone is under warranty and you don’t want to avoid it, don’t worry. Flashing a stock firmware with Odin will not trigger KNOX. You will still be covered under warranty. However, we do not take responsibility if something goes wrong with your phone. Please proceed at your own risk.Download files
- Download Samsung Galaxy S8 USB Drivers
- Odin flashing tool for Galaxy S8 (Download)
- Stock firmware for S8 and S8+ (Download)
Installation process
- Go to the firmware download page, and enter your phone’s model number. If you don’t know it, go to Settings > About Phone > Model Number. You can download builds for Exynos and Snapdragon variants of S8 and S8+.
- Turn off your phone. Press and hold the volume down, Bixby and power keys at the same time to go into download mode.
- Connect your phone to your PC using the included USB cable.
- Download Odin and extract it. Launch the program.
- If the firmware you downloaded is in a zip file, extract it. You will receive a tar.md5 file.
- On Odin, click on AP and select the newly downloaded stock firmware.
- Click on the start button.
How to unlock pattern using computer
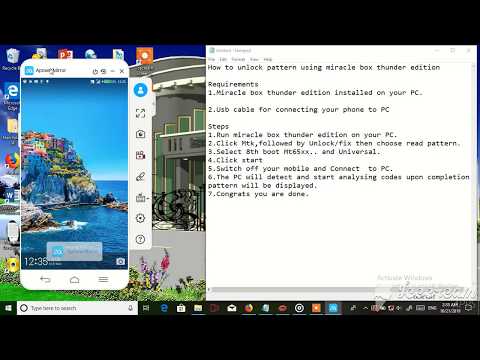
This video shows how to unlock pattern using computer.The process is
very simple.Pattern codes will be analyzed and displayed.Thank you for
watching.The video is for educational purposes only not for other
uses.Don"t forget to subscribe.
Wednesday, October 16, 2019
How to Flash Huawei Y625 Stock Firmware – All Firmwares

if you have a Huawei Device, You can flash Huawei Y625 Stock firmware to upgrade or downgrade your Huawei smartphone, or if you want to repair your Huawei Y625 if it is stuck on Huawei logo, Boot Screen, or stuck in boot loop… or you don’t receive the OTA update for any reason.
Huawei Y625 powered by Quad-core 1.2 GHz Qualcomm MSM8212 Snapdragon 200 chipset, the device has 1 GB RAM and 4 GB ROM, up to 32 GB via microSD. Huawei Y625 comes with 2 MP Camera in front & 8 MP in back.
Huawei Y625 offers a 5.00-inch IPS LCD with a resolution of 480 x 800 pixels, The Huawei Y625 Run Android 4.4.2 KitKat and comes in 2 Colors (Black, White). and powered by Non-removable Li-Po 2000 mAh battery.
Requirments:
- Flash Huawei Y625 Firmware: How to Flash Huawei Stock Firmware – All Methods
- Install Huawei Y625 USB Driver: Download & Install Huawei Y625 USB Driver
- Make sure you are flashing the right flash file, We are not responsible for any harm that might come to your Smartphone.
Download Huawei Y625 Stock Firmware
Do not use this firmware on any other Huawei devices. this stock Firmware fit only for your Huawei Y625 device. The ROM file on this page is the official ROM file published by the company:Backup Huawei Y625
Backup all your important data before flashing the Huawei Y625 Stock Firmware because installing firmware will erase all your data:
- GO to the Backup app on your home screen.
- Tab on Backup & Choose the location to which you want to back up your data

- Choose the data you want to backup. depending on your needs (Contacts, Messaging, Call log, images.videos…)
- Then touch Back up to begin the backup.
- set a password, you can Skip if you don’t want to set a password
- After this is complete, tab Next to begin the backup.
Restore Huawei Y625

- Go back to the Backup app, & tab on Restore
- Choose the source of the data to be restored, and touch Next

- Enter your password you set up early then touch OK
- Select the data you want to restored and touch Start restoration.
- Once you choose to restore your back up data
- You can choose a location to restore backed up data (Contacts, Messaging, Call log, images.videos…)
- Finally, tab on OK to finish.
| Build Number | Android OS | Download |
| Y625-U32 V100R001C328B108 | 4.4.2 KitKat | FullOTA |
| Y625-U32 V100R00 | 4.4.2 KitKat | FullOTA |
| Y625-U21 V100R001C142B103 | 4.4.2 KitKat | FullOTA |
| Y625-U32 V100R001C328B104 | 4.4.2 KitKat | FullOTA |
| Y625-U32 V100R00 | 4.4.2 KitKat | FullOTA |
| Y625-U32 V100R001C328B108 | 4.4.2 KitKat | FullOTA |
| Y625-U32 V100R001C328B105 | 4.4.2 KitKat | FullOTA |
| Y625-U32 V100R001C328B104 | 4.4.2 KitKat | FullOTA |
| Y625-U13 V100R001C464B103 | 4.4.2 KitKat | FullOTA |
| Y625-U13 V100R001C153B100 | 4.4.2 KitKat | FullOTA |
| Y625-U43 V100R001C464B103a | 4.4.2 KitKat | FullOTA |
| Y625-U13 V100R001C54B101 | 4.4.2 KitKat | FullOTA |
| Y625-U43 V100R001C464B103a | 4.4.2 KitKat | FullOTA |
| Y625-U13 V100R001C464B103 | 4.4.2 KitKat | FullOTA |
| Y625-U13 V100R001C482B103 | 4.4.2 KitKat | FullOTA |
| Y625-U43 V100R001C464B105 | 4.4.2 KitKat | FullOTA |
| Y625-U43 V100R001C332B100a | 4.4.2 KitKat | FullOTA |
| Y625-U51 V100R00 | 4.4.2 KitKat | FullOTA |
| Y625-U51 V100R001C577B105 | 4.4.2 KitKat | FullOTA |
| Y625-U51 V100R001C577B105 | 4.4.2 KitKat | FullOTA |
| Y625-U51 V100R001C577B108 | 4.4.2 KitKat | FullOTA |
| Y625-U51 | 4.4.2 KitKat | FullOTA |
| Y625-U32 V100R001C567B103 | 4.4.2 KitKat | FullOTA |
Tuesday, October 15, 2019
Rental Management System Designed on Visual Studio 2012

Hi Everyone! In this video i will show you a sample demo of Rental
Management Systems designed on visual studio 2012. This is a simple
demo,it can be developed further..Thank you for watching have a
wonderful time. Don't forget to subscribe...
How to flash Infinix X572

In this video i will show you how to flash infinix X572 using SP flash tool.
Requirements:
1:Sp flash tool
2:Sp flash tool drivers or Mtk usb drivers
3:Infinix X572 firmware or flash file
All the necessary steps shown in the video.
Requirements:
1:Sp flash tool
2:Sp flash tool drivers or Mtk usb drivers
3:Infinix X572 firmware or flash file
All the necessary steps shown in the video.
How to flash Tecno J8

This video shows how to flash Tecno J8 using Miracle Box[Thunder Edition].
Requirements:
1:Miracle Box[Thunder Edition].
2:Mtk usb drivers/Miracle box drivers.
3:Tecno J8 firmware or flash file.
All the necessary steps shown in the video.Thank you.
Requirements:
1:Miracle Box[Thunder Edition].
2:Mtk usb drivers/Miracle box drivers.
3:Tecno J8 firmware or flash file.
All the necessary steps shown in the video.Thank you.
How to Flash Samsung Galaxy S7 using ODIN Tool on Computer

You might have come across the term flashing for Android devices many
times. What basically is flashing, why is flashing required and how to
flash Samsung Galaxy S7/S7 Edge using ODIN software on PC. Today we are
here with a guide that will cover all these important topics.
What is Flashing?
Flashing on Android devices means that you are attempting to re-install the operating system of your Android device, similar to how you reinstall Windows on a PC.Why is Flashing Necessary?
Flashing for Android devices becomes necessary in case you need to reinstall the operating system of your Android device due to some software problems. Flashing is done especially when the Reset option does not serve to help solve the issue.What are the Important Points to Note Before Flashing any Android Device?
Below are some of the points to keep in mind before you attempt to flash your Android device:- If you flash your Android device, you will wipe away all the data stored on your device memory.
- There should not be any kind of interruption while the flashing on Android devices is going on until it is completed.
- To complete the flashing process successfully, make sure that your device has enough storage space to accommodate the file that is being flashed.
- Your Android device must have a minimum battery backup of 80%.
How to Flash Samsung Galaxy S7/S7 Edge using ODIN Tool on PC?
The Samsung Galaxy S7/S7 Edge is a very popular Android Smartphone. Many people search on how to flash Samsung Galaxy S7/S7 Edge using ODIN tool on PC. Today we are here with a detailed guide which will help you flash Samsung Galaxy S7/S7 Edge using ODIN tool easily.Requirements to Flash Samsung Galaxy S7/S7 Edge using ODIN Tool on PC:
- Computer running the Windows software with version XP or above.
- A good quality USB Data cable.
- ODIN Flash Tool. You can download the ODIN Flash Tool for free from here.
- The original and authentic software of your Samsung Galaxy S7/S7 Edge called the Stock ROM. Make sure to find the right Stock ROM that matches your device name and model number.
Easiest Way to Flash Samsung Galaxy S7/S7 Edge using ODIN Flash Tool on PC:
- Launch
the ODIN Flash Tool on your PC. From the ODIN Window, click on the
button that says “BL” and then navigate to the Stock ROM that you must
have downloaded by now. Select the file that says “BL” in it.

- Follow the above step for all the three buttons below the “BL” button and select corresponding files of your stock ROM.
- Power OFF and then boot your Galaxy S7 to Download Mode by pressing Volume Down+Power+Home keys.
- Connect your Galaxy S7/S7 Edge to the PC.
- Click on the “Start” button from the ODIN tool.
- Wait for the flashing to complete.
- Wait until you get the “Pass” message.

- Once you get the Pass message, your Galaxy S7/S7 Edge will then reboot.
- Now disconnect your device from the PC.
You have successfully flashed Stock ROM on Samsung Galaxy S7/S7 Edge.
In case you face any difficulties, please mention the issues as comments below and we will help you out.